Looking to drive away your hamster’s boredom? Try your hands on our easy-to-make DIY hamster toys to experiment with your craft skills and make arrangements for your little one’s entertainment. These super easy DIY toys will not only help you save some dollars, but you can also do your bit towards the environment by using household items.
Some materials you may require to begin this creative adventure include cardboard boxes, wooden popsicle sticks, non-toxic glue, etc. In case your hamster has a habit of nibbling, please make sure that the raw materials used to create the toys are hamster-friendly. So, without any further ado, let’s get started!
Essential Requirements To Start Making DIY Hamster Toys
Before jumping straight into creating these fun items for your tiny rodent it is important to check the availability of raw materials. As a hamster owner, you must be aware of your little one’s love for chewing. Hence, it becomes crucial to ensure that all the items used in the creation of toys and other items are safe and possibly ingested.
Check around the house and find items like cardboard boxes, non-toxic glue, toilet paper, etc. If these items happen to be unavailable, consider getting them from a nearby local stationery shop. Alternatively, you can wait for some time to collect the required items and then get started.
Also, you can create your DIY glue by mixing an equal amount of white flour and water. Ensure consistency and you will be good to go.
Making A Hamster Wheel
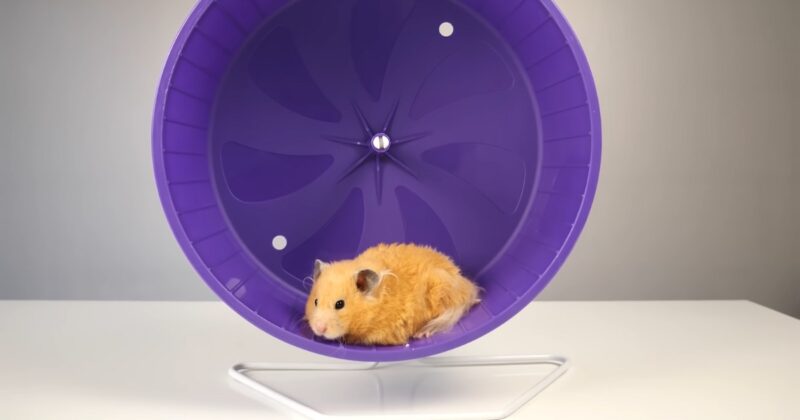
Hamster is known to run for 5-6 miles every to match those in the wild. Running on wheels also fulfills their exercise requirements and in turn, makes your furry friend happy and content.
Pet shops offer a variety of wheels. However, they have their pros and cons and involve some amount of investment. Here is a DIY version hamster wheel that I made for my little one. It works well and is a lot less noisy. You can try making it too!
Container Tub Wheel
Required supplies:
- A circular plastic container with an open lid
- Three wooden strips to make stands
- Two nuts
- A bolt
- Two screws
Procedure to create a Container Tub Wheel:
Take two wooden strips. Make sure that one is shorter than the other. If they happen to be of the same size, you can cut one of them to make it shorter. Now, arrange the strips to form a ‘T’. This will serve as the base of the stand. You can use non-toxic glue to arrange them in a ‘T’ shape.
However, the glue might not provide enough support. To make sure that the adjustment is tight and secure, make use of a screw.
To complete the stand, take the third wooden strip. This wooden strip should be long enough. Place this strip at an angle of 90 degrees by the short wooden strip. To make it secure and tight, again, make use of non-toxic glue and screw. Congratulations! Your stand for the wheel is ready. Let’s move on to the Wheel part.
Take the circular plastic container and drill a hole in the middle of its base to fit in the stand created. Position the stand in such a manner that there is enough room for it to spin. The next step is to drill a hole in the wooden piece which was arranged at an angle of 90 degrees. The hole should be aligned with the one on the plastic container.
Put a bolt through the container and fix it using a nut. The fixing should be loose enough to make the wheel spin. The other end of the bolt is to be passed through the hole in the stand and this connection can be secured with a nut. Your wheel is ready to be placed in the cage. The placing can be done in a way that your tiny one does not end up chewing the metal bolts.
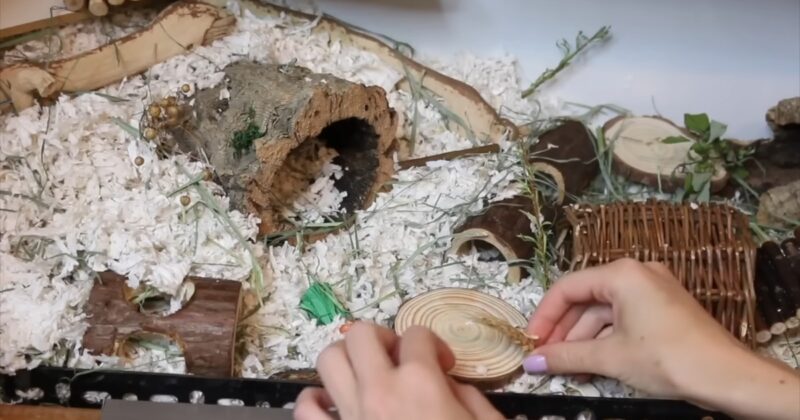
Tunnels For Hamsters
Hamsters love hideouts and what else could be better for them to hide other than tunnels?
Required supplies:
- Cardboard
- Some toilet paper tubes
- Bedding
- A cutter
Procedure to create tunnels for hamsters:
To begin with, trace the size of the circle of the tubes on the cardboard and cut them. This will create a circular in the cardboard boxes. Repeat this step to make several holes in the cardboard. Your hammy will have a good time entering and exiting through various options. Now, place the toilet paper tubes into the holes. You can make use of non-toxic glue to fix them right.
Tip: Do not force the tubes into the hole. Doing so might distort the shape of the box and your pet may find it difficult to move through. This tunnel is good for Panda Bear and Black Bear Hamsters.
Once the tubes are fixed into the holes, cover the tunnel with bedding to make this tunnel toy more challenging and fun for your little one.
Note: Instead of cardboard boxes, you can also use shoe boxes, empty tea packages, or milk cartons. Reuse these packages to create an adventurous journey for your furry friend and at the same time do your bit for the environment.
DIY Hamster Tubes
Somewhat similar to tunnels, you can create your own tube to express your love towards your pet. Hamsters love toys and a tube can be the perfect entertainment for them.
Required supplies:
- Paper towel rolls/toilet paper rolls (Either of them will work)
Procedure to create a hamster tube:
Since the material used is already cylindrical there is not much work to do here. All you have to do is cut holes into the tube so that your hamster has multiple places to run. You can also put some treats inside the tube.
DIY hamster tubes are so popular among hamster owners as they are much better than the plastic ones that the pet shops offer. Secondly, not much effort and expenses are incurred to create them.
Creating A Hamster Playground

A hamster playground is more like an obstacle course for your little one.
Required Supplies:
- You can use a variety of items such as toilet paper, tubes, etc. which allows you to be as creative as you can be.
Procedure to create a hamster playground
The first step is to create a box frame to define the playground area. The box frame can be created using popsicles and glue. Make a roof, base, and two sides using the same.
Now, to make the area interesting and fun, create tunnels using tubes and let them dazzle mid-air. You can use yarn to tie the tunnels to the roof. To create a tunnel, you can use a toilet paper roll. You can also go for DIY tunnels
Consider adding some ladders made using popsicle sticks to make the area more challenging for your tiny one. While allowing your hamster to roam around the play area keep a close watch on them so that they do not nibble on something and fall sick.
Hamster Chew Toys
A notable feature in hamsters is their constantly growing teeth which demand special care to keep them healthy and in check. To serve this purpose, you can provide your tiny rodent with wooden blocks and sticks so that they can gnaw the same.
Chewing toys also keep your hamster busy. Hence, getting chewing toys for your little one becomes extremely important not only from a health perspective but also for entertainment.
Required Supplies (for hamster chew sticks)
- Wood skewers
- White flour
- Water
- Scissors
Procedure to make Hamster Chew sticks:
This one is super simple to make. All you have to do is mix water and white flour in a ratio of 1:1. Secondly, cut the wooden skewers of length 3 inches each; dip them in the mixture created to stick the five pieces together.
Allow them to dry overnight and the chew sticks are ready. Please use a brush to dip/apply the glue mixture on the wooden skewers.
Required supplies (for chew balls):
- Toilet roll tubes
Procedure to make Chew balls:
Another extremely easy and quick DIY toy for your pet. This toy does not even require much material. Take a toilet roll tube and chop it into equal size. You can chop it into five to maintain the size. Nevertheless, you will only require three.
Place the ring inside the other to form a sphere. Repeat the procedure to fit in the third ring inside the other two. The chew ball with slight gaps between them is ready. To make the ball more loveable for your hamster, consider adding some treats in between the gaps. You can fill it with seeds, mealworms, etc.
Building A Home For Your Little One
You can create a hamster home in different forms. Decide the type of cage you want to build for your pet and arrange the raw materials accordingly.
Here are a few ideas to go about the same:
A two-story house: By going vertical, you can let your hammy get a good view from the enhanced height.
Required supplies:
- Two empty tissue boxes, preferably square tissue boxes.
- A pair of scissors
- A ruler
- Several small pieces of clothes
- Several empty toilet paper tubes
- Non-toxic glue/ DIY glue (made of white flour and water)
Procedure to make a two-story house:
First, use a pair of scissors to cut down the plastic layer at the opening of the tissue box. This will help your hamster to pass through the hole easily. Now, to make the house two stories, stack the two tissue boxes together and paste them nicely using glue. Make sure that the boxes perfectly lie one over the other.
Glue them in such a manner that the hole of one box faces towards the right and the other hole to the left. Two, three, and even up to five hamsters can live together in this. Do not paste it in a way that the two holes are on the same side. Hey! You are halfway through.
To create a walkway to the upper story, make use of the gathered toilet paper tubes. Measure the size of the house and then cut the tubes accordingly. After the tubes are cut perfectly, place several tubes to make the walkway from the lower to the upper level. Use non-toxic glue to attach the tubes if necessary.
Placing them within one another will also work fine. Consider attaching a cloth inside the walkway to provide more traction to your hammy so that he can move up and down easily.
Also, take into consideration the steepness of the walkway. Do not incline it so much; otherwise, your hamster won’t be able to climb up the tube. The final stage involves securing the walkway through the opening. Use non-toxic glue to fix the walkway perfectly so that it does not move or break down when your hamster climbs up. Cut the opening to a straight line and you are done!
Popsicle Sticks House
Another super creative house that you can make on your own is using popsicle sticks. Let’s explore how it can be made.
Required Supplies:
- Popsicle sticks
- Non-toxic glue
Procedure to make a home using popsicle sticks:
Using the sticks creates a strong base and a roof over the top for your little one. Paste the popsicle sticks together to make the four walls of the house. You can also add some windows to make it look more beautiful. Add two or more doorways making space for your tiny rodent to run in and out and play happily.
House Using Paper Mache
This is probably the easiest house you could make for your pet. Even young children can make it without any external assistance.
Required supplies:
- A jar
- Water
- Paper
All three required materials might surely be available at your place and hence this one is a must-try.
Procedure to make a house using paper mache:
Collect some clean paper. The paper should not have ink on it as your hamster may nibble on the cage and consume ink which might prove harmful for your pet. Put the jar in a bowl of water to make its outer sides wet. After that, place the strips of paper on the jar neatly.
Keep the jar aside and let it dry. Keep it aside for an overnight to get the shape of the jar. Consider using a popsicle stick if you face difficulty in taking the jar out. A popsicle stick will loosen the hold and make your work easier. The paper Mache house is ready! Fill it with some bedding and cut a door for your hammy to run in and out.
Make use of a balloon: Paper Mache can be used to create cages of various shapes and sizes. Nowadays, creative minds have come up with paper Mache homes using balloons. People tend to place a balloon instead of a jar. To make a rounded cage, you can go about the same too. You just have to insert a balloon in place of the jar.
However, the problem is, that the paper may not stick to the balloon with water. To make it stick, you will first have to create a mixture of non-toxic glue and then use the same. The biggest advantage of using a balloon is you can pop it up once the Mache is dry and hard. Whatever you use, be sure that the coating is stable enough to support your pet.
Building A Hamster Bin Cage
This one requires a little more effort in terms of collecting raw materials. However, when it comes to setting up, they are super easy. These bin cages are stable, serve a much similar setup offered in pet stores, and cost much less than the ones available in the market. Another major added advantage of these bin cages is that you don’t have to worry about your pet outgrowing the cage size.
Required Supplies:
- One large storage see-through bin
- Wire mesh
- Nuts, bolts, and washer.
Procedure to make a Bin cage for your hamster:
Purchase a bin of at least 20*30 inches so that your hammy has enough floor space and comfortably fits inside the cage. Also, make sure that the bin is deep and a wheel of approximately 11-12 inches fits in. Use a wire mesh while making the cage. Consider getting the smallest one. the 19-23 gauge would do perfectly fine.
You can easily get this “hardware cloth” at Home Depot. To fix the mesh into the lead, use nuts, bolts, and a washer. You will be required to get 16 of them to do the same. As of wiring is concerned, I didn’t buy one for my hamster’s cage the mesh came with wire wrapping.
Nevertheless, if you wish to purchase one, A foot-long length of plain old’ wire will work. Place other essential hamster items inside the cage to make a perfect hamster home. Add a water bottle to the cage, and place a food bowl, hamster wheel, and other hamster toys that your pet would love.
DIY Beddings For Hamsters
Confused about what to place in your hammy’s home as bedding?
Here are a few things you can consider using to fill the cage up. The best part is you can create all these all by yourself. You can place dry tissue papers as bedding in your hamster’s cage.
They can have a good time biting and tearing them apart. Make sure you place plenty of them. It is also important to keep checking that the bedding is clean to ensure that your hamster is completely safe. Dirty and wet areas make your hamster prone to skin and other diseases.
DIY Hamster Ladder
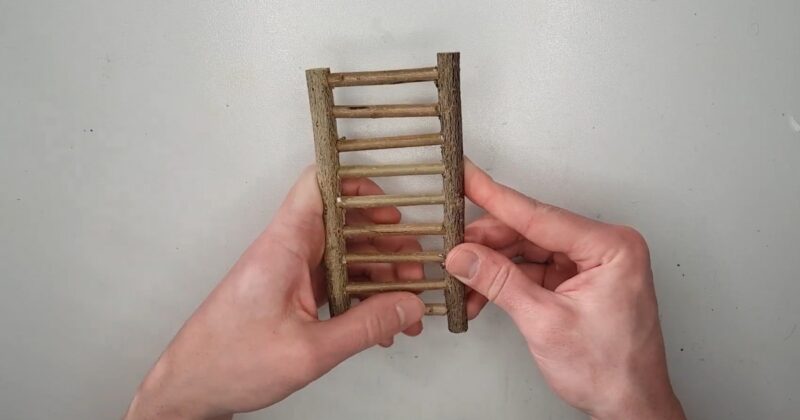
Have a hamster cage with different levels? Why not try some amazing DIY hamster ladders and add fun to your hammy’s space? Let me tell you that these DIY hamster ladders serve as a way for your hamster to climb his favorite platforms.
Required Supplies:
- Popsicle sticks
- Non-Toxic Glue
They do not require much raw material and can be created easily during leisure time.
Procedure to create hamster ladders:
Place the sticks vertically one over the other and stick them together using a non-toxic glue. Now horizontally place the popsicle sticks and glue the ends to the vertical sticks to create steps. You can create as many steps as you want. Repeat the procedure until the structure is long enough.
Note: Hamster ladders are best during supervised playtime. It is advised to remove the ladder during nighttime so that your pet does not nibble on the toy.
Some other creative hamster toys:
When it comes to DIY hamster toys, you can be creative as much as you can and reuse items that you probably thought were of no use. You may use empty milk cartons, cardboard, some old socks, etc. to create out-of-the-box items that your hamster is going to love and have fun with.
DIY Maze Toys For Hamsters
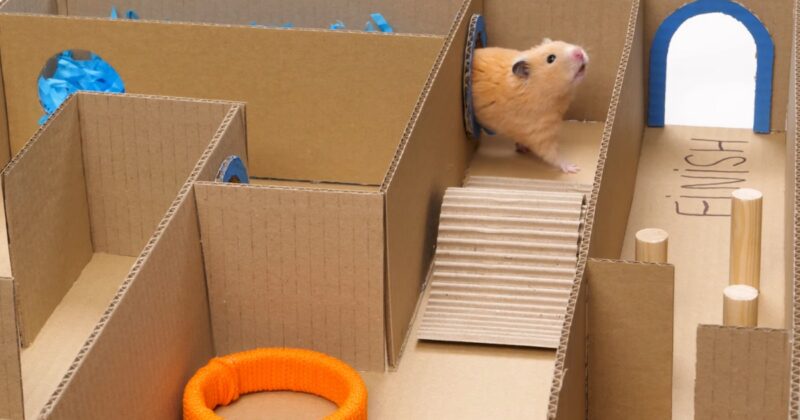
DIY maze toys are great to keep your hamster entertained and busy. If you have kids. You can ask them to lend Legos to create mazes high enough so that your pet cannot climb up the walls and get out.
Required supplies:
Otherwise, you can also use DVDs to make this creative maze. To make the maze more fun, you can add tunnels, steps slopes, and many other things. The sky is the limit! Nevertheless, while your hamster is in the maze, it is important to keep an eye on them to check they do not nibble on any plastic item.
Required Supplies:
- 3 empty tissue boxes
- A pair of scissors
- Non-toxic glue
- A craft knife
- Pencil
- Paint
Procedure to make a creative homemade maze:
Take 2 tissue boxes and the front neatly. You can use scissors to make the cuttings neat. Now, paste them side to side using non-toxic glue. To make it look more beautiful, add some colors to it. Paint the outer base area of the two boxes using your favorite colors. The base of the maze is ready. We will now design the interior layout structure.
For that, use a pencil to draw on the bottom of the tissue box. The next step will use the third tissue box. Use a craft knife to cut it open. Cut rectangular strips out of this and bend them into the required shape to complete the maze structure.
Make sure that the strips are by measurement of the other two boxes that form the pillar of the maze. Position the strips inside the main pillar to form the walls of the maze. Stick the walls with the bottom of the structure and allow it to dry.